
Sử dụng WCF trên ứng dụng Windows Form
Trong bài viết trước các bạn đã biết cách sử dụng WCF Service trên ứng dụng Windows Phone. Nếu bạn chưa biết cách sử dụng WCF Service hãy cùng xem lại các bài viết này:
Trong bài viết này chúng ta sẽ cùng tìm hiểu cách thức sử dụng WCF trên ứng dụng Windows Form.
Mở đầu
Trong kỉ nguyên của điện toán đám mây thì các lập trình viên thường sẽ thấy và quan tâm nhiều hơn đến các ứng dụng web và mobile thế nhưng với các ứng dụng đòi hỏi độ bảo mật cao, hiệu năng nhanh, giao diện đẹp đẽ, tính năng phong phú như các ứng dụng cho doanh nghiệp thì ứng dụng Windows Form lại hết sức phù hợp. Tuy Microsoft đã ra mắt công nghệ WPF để làm công nghệ chủ đạo trong việc xây dựng các ứng dụng Desktop nhưng thực sự công nghệ này chưa thành công bởi hiệu năng và độ trưởng thành của nó chưa thể bằng công nghệ Windows Form. Vì vậy nhu cầu xây dựng các ứng dụng Windows Form vẫn rất lớn, trong bài viết này chúng ta sẽ cùng tìm hiểu cách thức xây dựng một ứng dụng Windows Form quản lý Sinh viên sử dụng WCF Service để thao tác dữ liệu. Cách thức sử dụng WCF Service trên Windows Form tương tự như trên ứng dụng Windows Phone 8.1 Silverlight đó là sử dụng Add Service Reference.
Tạo WCF Service thao tác dữ liệu
Trước tiên chúng ta sẽ tạo WCF Service để tương tác dữ liệu.
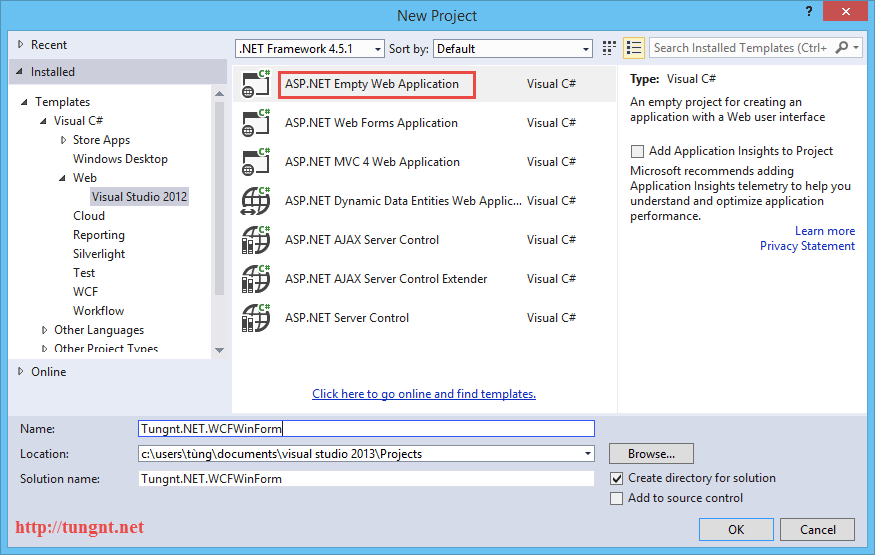
Bước 1: Trong Visual Studio 2013 chúng ta tạo mới 1 project web

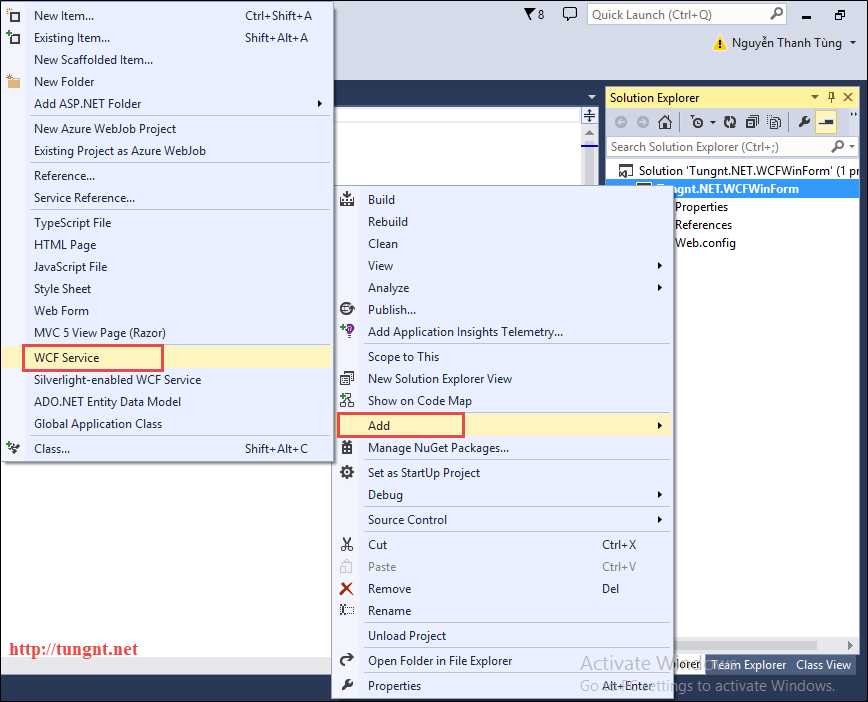
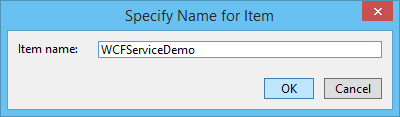
Bước 2: Thêm Item mới cho project và chọn WCF Service

Bước 3: Xóa gen code mặc định của Visual Studio và bổ sung 4 method thao tác dữ liệu như bên dưới:
[ServiceContract]
public interface IWCFServiceDemo
{
    /// <summary>
    /// Get All Students From Database: Static List
    /// </summary>
    /// <returns>List of Student</returns>
    /// @Created by tungnt.net - 5/2015
    [OperationContract]
    List<Student> GetStudents();

    /// <summary>
    /// Add New Student To Static List
    /// </summary>
    /// <param name="newStudent">New Student To Add</param>
    /// <returns>True/False - Success/Failed</returns>
    /// @Created by tungnt.net - 5/2015
    [OperationContract]
    Boolean AddStudent(Student newStudent);

    /// <summary>
    /// Update Student To Static List
    /// </summary>
    /// <param name="updateStudent">Student to update</param>
    /// <returns>True/False - Success/Failed</returns>
    /// @Created by tungnt.net - 5/2015
    [OperationContract]
    Boolean UpdateStudent(Student updateStudent);

    /// <summary>
    /// Delete Student From Static List
    /// </summary>
    /// <param name="studentID">StudentID to delete</param>
    /// <returns>True/False - Success/Failed</returns>
    /// @Created by tungnt.net - 5/2015
    [OperationContract]
    Boolean DeleteStudent(int studentID);
}
Ở đây chúng ta sử dụng class Student để lưu thông tin Sinh viên truyền qua lại giữa client và server
public class Student
{
    public int StudentID { get; set; }

    public string StudentName { get; set; }

    public string Class { get; set; }

    public string Professional { get; set; }
}
Bước 4: Implement các method, để demo ở đây chúng ta sẽ không sử dụng database mà sẽ dùng thẳng một static List như bên dưới thay thế bảng dữ liệu database
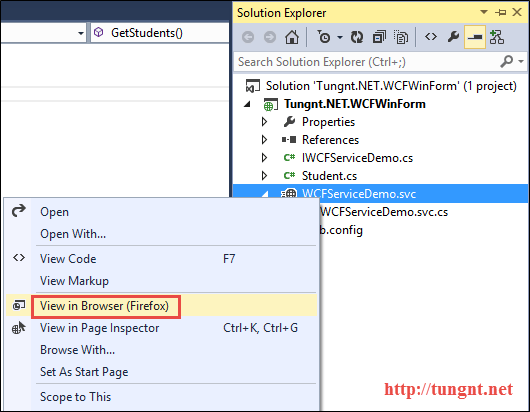
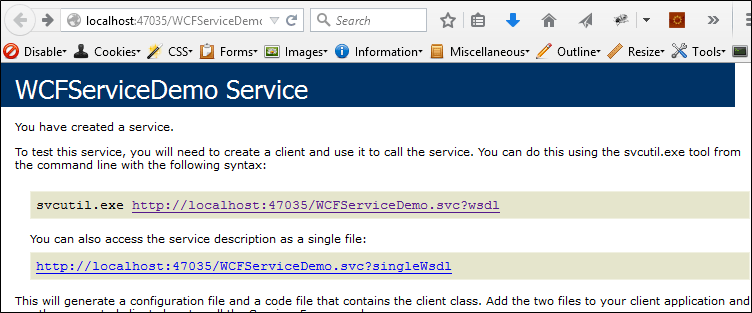
/// <summary>
/// Student Manager Demo Using WCF in Winform Application
/// @Created by tungnt.net - 5/2015
/// </summary>
public class WCFServiceDemo : IWCFServiceDemo
{
    //For demo purpose so we use a static list instead of database
    private static List<Student> studentList = new List<Student>() { new Student { StudentID = 1, StudentName = "Nguyễn Văn A", Class = "CNTT", Professional = "Công nghệ phần mềm" }, new Student { StudentID = 2, StudentName = "Nguyễn Văn B", Class = "ĐTVT", Professional = "Mạng máy tinh" } };

    public List<Student> GetStudents()
    {
        return studentList;
    }

    public bool AddStudent(Student newStudent)
    {
        bool Result = false;
        try
        {
            studentList.Add(newStudent);
            Result = true;
        }
        catch (Exception)
        {
            Result = false;
        }
        return Result;
    }

    public bool UpdateStudent(Student updateStudent)
    {
        bool Result = false;
        try
        {
            var originalStudent = studentList.Where(e => e.StudentID == updateStudent.StudentID).FirstOrDefault();
            if (originalStudent != null)
            {
                studentList.Remove(originalStudent);
                studentList.Add(updateStudent);
                Result = true;
            }
        }
        catch (Exception)
        {
            Result = false;
        }
        return Result;
    }

    public bool DeleteStudent(int studentID)
    {
        bool Result = false;
        try
        {
            var deleteStudent = studentList.Where(e => e.StudentID == studentID).FirstOrDefault();
            if (deleteStudent != null)
            {
                studentList.Remove(deleteStudent);
                Result = true;
            }
        }
        catch (Exception)
        {
            Result = false;
        }
        return Result;
    }
}
Bước 5: Service đã xây dựng xong, bước cuối cùng là kiểm tra bằng browser xem mọi thứ đã ổn chưa


Như vậy là phần chuẩn bị service đã xong, chúng ta cùng sang phần tiếp theo đó là xây dựng một ứng dụng Windows form sử dụng service này
Sử dụng WCF Service trên Winform Application
Trong phần này chúng ta sẽ xây dựng một ứng dụng Winform quản lý sinh viên sử dụng WCF Service ở trên. Cách thức xây dựng bao gồm 5 bước đơn giản như sau:
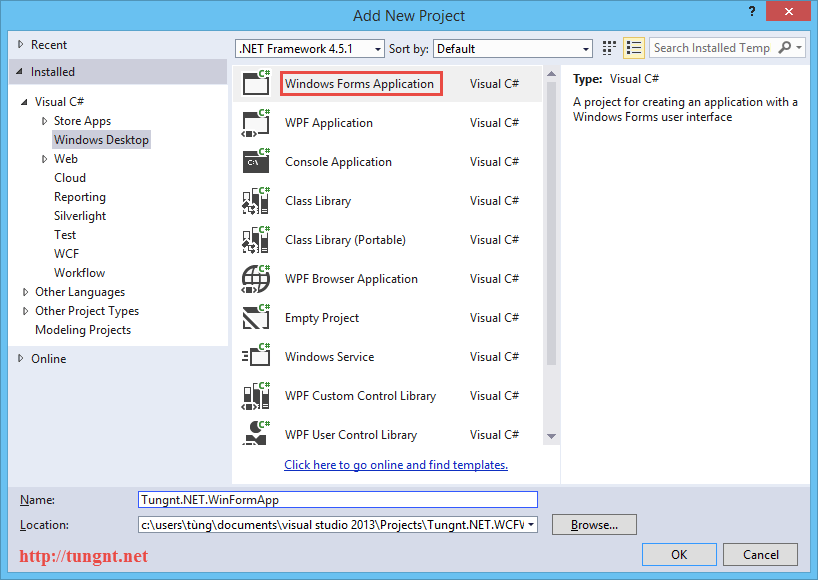
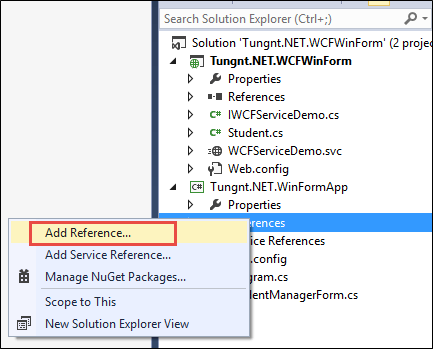
Bước 1: Trong solution Tungnt.NET.WCFWinForm ta tạo một Project Windows Form App như hình dưới

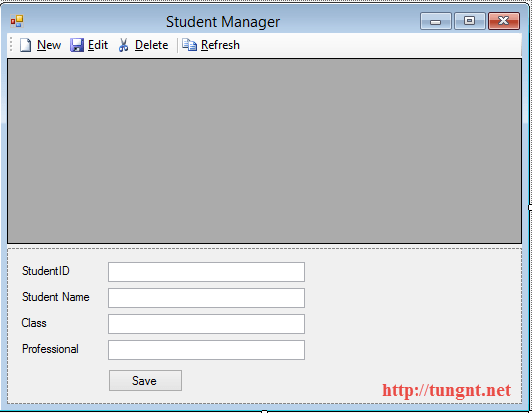
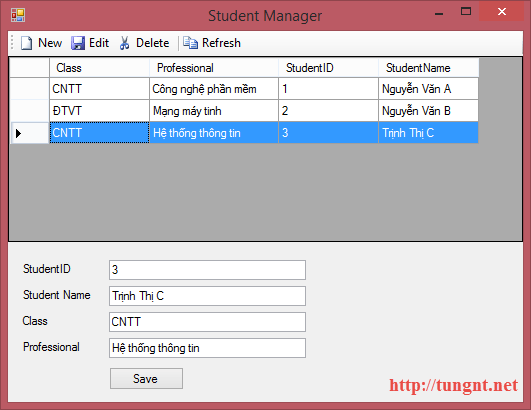
Bước 2: Thiết kế giao diện ứng dụng Windows Form, ứng dụng này sẽ đơn giản chỉ gồm 1 DataGridView và các button Thêm, Sửa, Xóa, Nạp
Đổi tên Form1 thành StudentManagerForm và đổi tên Title Form thành Student Manager
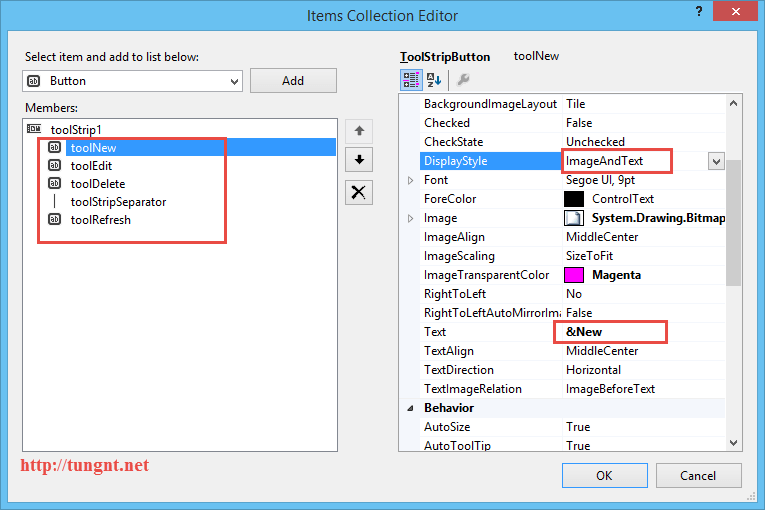
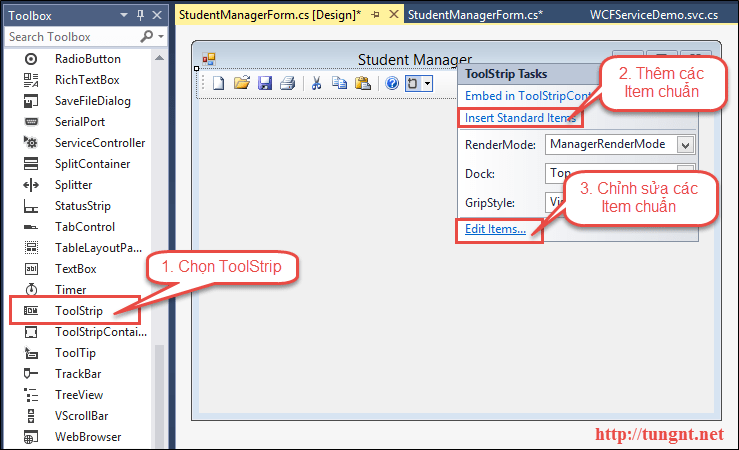
Thêm ToolStrip có 4 chức năng Thêm, Sửa, Xóa, Nạp theo các bước: Thêm Toolstrip từ Toolbar, Thêm các Item chuẩn, Chỉnh sửa các Item Chuẩn

Khi chỉnh sửa các Item chuẩn một số thuộc tính cần chú ý đặt lại như: tên toolitem, Text của toolItem và đặc biệt là DisplayStyle: ImageAndText để hiển thị cả Image và Text như hình dưới
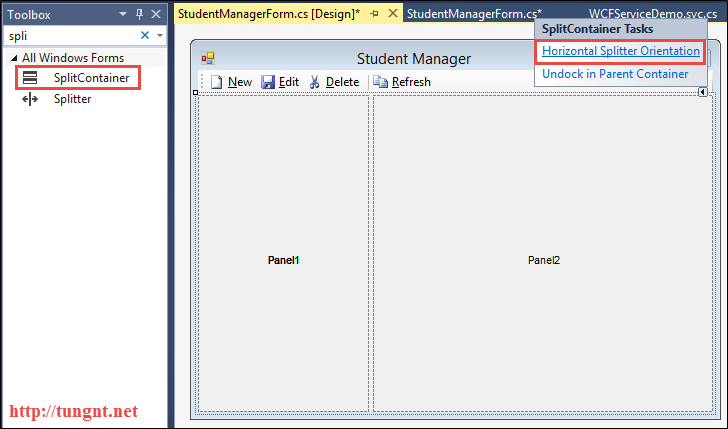
Thêm SplitContainer, chuyển mode về Horizontal Splitter Orientation.

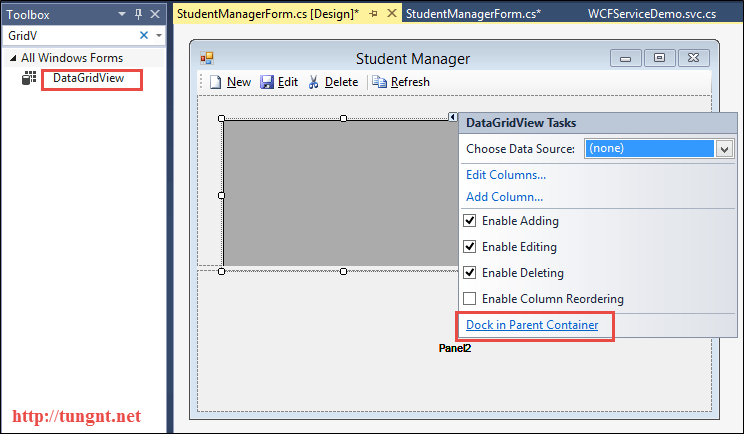
Sau đó kéo DataGridView vào Panel1, chọn Dock in Parent Container, đặt tên là gridStudent, chọn selectionMode = FullRowSelect để lựa chọn cả một row trên Grid chứ không phải từng cell

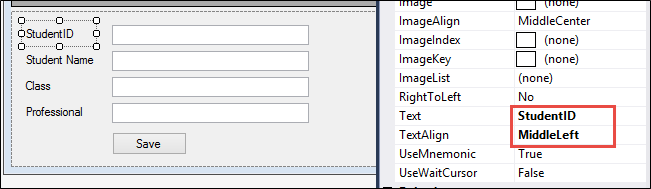
Cuối cùng thiết kế giao diện để Thêm, Sửa một sinh viên trong Panel2 như hình dưới, chú ý Label đặt AutoSize bằng False và TextAlign bằng MiddleLeft cho đẹp
Chúng ta đã vẽ xong được một giao diện ứng dụng Winform có các chức năng cơ bản:
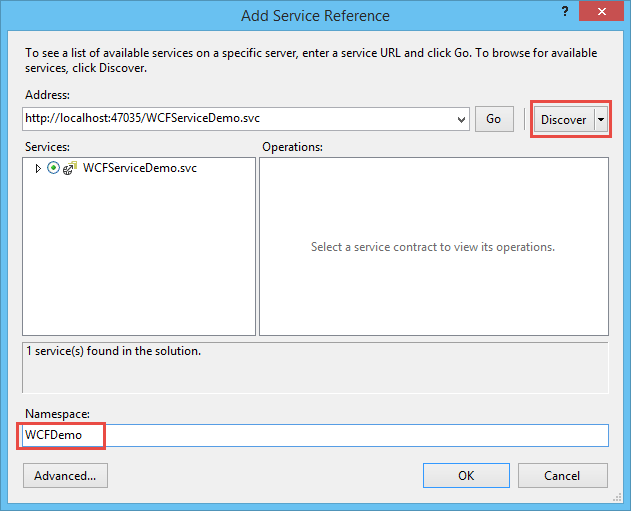
Bước 3: Right-click vào References và chọn Add Service Reference. Sau đó ta nhấn Discover để tìm các service trong cùng Solution. Ta sẽ thấy WCFServiceDemo service xuất hiện, ta tiến hành đặt tên Namespace service là WCFDemo và nhấn OK


Bước 4: Viết Code xử lý cho các sự kiện trên Toolbar và button Save. (Chú ý: double click vào từng toolItem và button Save trên designer để Visual Studio sinh cho ta các event handler tương ứng) Ở đây trong bài này để phục vụ mục đích demo nên chúng ta không sử dụng các cơ chế binding tự động qua BindingSource cũng như DataSet trên DataGridView mà sẽ viết hoàn toàn trong code.
/// <summary>
/// Student Manager Demo Using WCF in Winform Application
/// @Created by tungnt.net - 5/2015
/// </summary>
public partial class StudentManagerForm : Form
{
    public StudentManagerForm()
    {
        InitializeComponent();
        try
        {
            WCFDemo.WCFServiceDemoClient client = new WCFDemo.WCFServiceDemoClient();
            grdStudent.DataSource = client.GetStudents();
        }
        catch (Exception ex)
        {
            MessageBox.Show(ex.Message);
        }
    }

    private void toolNew_Click(object sender, EventArgs e)
    {
        try
        {
            //Create a new student for demo purpose only
            txtStudentID.Text = txtStudentName.Text = txtClass.Text = txtProfessional.Text = string.Empty;
        }
        catch (Exception ex)
        {
            MessageBox.Show(ex.Message);
        }
    }

    private void toolEdit_Click(object sender, EventArgs e)
    {
        try
        {
            DataGridViewRow selectedRow = grdStudent.SelectedRows[0];
            if (selectedRow != null)
            {
                //Manual binding for demo purpose only
                txtStudentID.Text = selectedRow.Cells["StudentID"].Value.ToString();
                txtStudentName.Text = selectedRow.Cells["StudentName"].Value.ToString();
                txtClass.Text = selectedRow.Cells["Class"].Value.ToString();
                txtProfessional.Text = selectedRow.Cells["Professional"].Value.ToString();
            }
        }
        catch (Exception ex)
        {
            MessageBox.Show(ex.Message);
        }
    }

    private void toolDelete_Click(object sender, EventArgs e)
    {
        try
        {
            WCFDemo.WCFServiceDemoClient client = new WCFDemo.WCFServiceDemoClient();
            if (MessageBox.Show("Are you sure you want to delete this student?", "Student Manager", MessageBoxButtons.OKCancel) == DialogResult.OK)
            {
                int deleteStudentID = int.Parse(grdStudent.SelectedRows[0].Cells["StudentID"].Value.ToString());
                if (client.DeleteStudent(deleteStudentID))
                {
                    grdStudent.DataSource = client.GetStudents();
                }
            }
        }
        catch (Exception ex)
        {
            MessageBox.Show(ex.Message);
        }
    }

    private void toolRefresh_Click(object sender, EventArgs e)
    {
        try
        {
            WCFDemo.WCFServiceDemoClient client = new WCFDemo.WCFServiceDemoClient();
            grdStudent.DataSource = client.GetStudents();
        }
        catch (Exception ex)
        {
            MessageBox.Show(ex.Message);
        }
    }

    private void btnSave_Click(object sender, EventArgs e)
    {
        try
        {
            //Check student is new Student or update Student
            bool isNewStudent = true;
            foreach (DataGridViewRow item in grdStudent.Rows)
            {
                if (item.Cells["StudentID"].Value.ToString() == txtStudentID.Text)
                {
                    isNewStudent = false;
                    break;
                }
            }

            WCFDemo.WCFServiceDemoClient client = new WCFDemo.WCFServiceDemoClient();
            Student oStudent = new Student() { StudentID = int.Parse(txtStudentID.Text), StudentName = txtStudentName.Text, Class = txtClass.Text, Professional = txtProfessional.Text };
            if (isNewStudent ? client.AddStudent(oStudent) : client.UpdateStudent(oStudent))
            {
                grdStudent.DataSource = client.GetStudents();
            }
        }
        catch (Exception ex)
        {
            MessageBox.Show(ex.Message);
        }
    }
}
Sau khi đã hoàn tất 4 bước trên chúng ta có thể chạy và hưởng thụ ngay kết quả:
Kết luận
Trong bài viết này chúng ta đã cùng tìm hiểu cách thức sử dụng WCF trên ứng dụng Windows Form. Mặc dù công nghệ Windows Form đã ra đời rất lâu và các lập trình viên ngày nay không thực sự hào hứng với nó nhưng cho đến hiện nay nó vẫn rất thịnh hành trong việc xây dựng các ứng dụng cho doanh nghiệp. Vì vậy nhu cầu nắm vững ứng dụng Winform nhất là việc kết nối sử dụng service là rất quan trọng. Ví dụ demo trong bài này hết sức cơ bản nên không đặt nặng việc sử dụng database cũng như thiết kế ở phía Windows Form, các bạn hoàn toàn có thể nghiên cứu để mở rộng thêm.
Trong các bài viết sau chúng ta sẽ cùng đi sâu hơn tìm hiểu cách thức xây dựng ứng dựng Windows form hoàn chỉnh từ việc thiết kế giao diện cho đến việc sử dụng Database.
Hy vọng bài viết này sẽ giúp ích cho các bạn trong quá trình xây dựng các ứng dụng của riêng mình. Nếu bạn có bất kì câu hỏi hay kinh nghiệm nào hãy chia sẻ bằng comment bên dưới bài viết và đừng quên chia sẻ cho bạn bè nếu thấy hữu ích.
Happy coding. Stay tuned.
P/s: Source code example các bạn có thể download tại đây: WCFWinformDemo